Sewing

Hellboy Costume

We had a superhero costume party to go to and Hellboy was suggested as the costume to make. I knew that Oliver + S had a trenchcoat pattern, and thanks to Alabama Chanin and the tea party dress, I’ve been eyeing off their patterns for a few years now. So I jumped at the excuse to buy one of their digital patterns.

One of the things I love about the Internet is being able to download a pattern and start sewing right away!

Well, by sew right away, I mean, print out the pattern, cut out and tape the pattern, lay out the pattern on the fabric and then start sewing right away.  And of course, I only gave myself a day and a half to do this. The secret agent coat is complete just enough to look like a real coat. The remaining items are some extra buttons and the button holes. I still haven’t gotten around to finishing it. Or getting better photos of it. But I do have some candid shots to share:FP_160403__MG_2718-Edit.jpgFP_160403__MG_2781.jpgFP_160403__MG_2817.jpgFP_160403__MG_2747.jpg

Inklingo · Quilting

Quilting progress

So here are a few photos of the quilting done so far. Do you think I should add another inner circle of quilting? 

    
Technically, I think this enough quilting for the batting, but I do feel that it could use more from an aesthetic point of view.  

Alabama Chanin · Crochet · Inklingo · Quilting · Sewing

A finish and progress on two other projects

That’s right! I’ve managed to start and complete a project! Remember the crochet from the last post? Well, it’s done and has been done for a while. I’ve just been so busy with work, baby and moving house. The main reason I’ve made progress on any of my projects is my commute to work. Which means, of course, that the only projects that get my attention are the portable ones!

First, I finished the crocheted scarf. I really enjoyed the double-hook Tunisian crochet process. It was quite a lot of fun… once I figured it out.

The scarf was one long piece that I’ve sewn into a twisted spiral. It’s effectively a Möbius strip. And because I only had one skein, it is more of a cowl than a scarf. But I like it! FP_160103__MG_2131.jpg

With the scarf completed, I went through my project closet to see what I had that was in progress and doable on my commute. I rediscovered my Alabama Chanin Indigo Star Quilt! The nice thing with this project is that once the top is done, the project is done! I used Inklingo 6″ Le Moyne Stars to print my shapes.

Apparently I started this blog after I started and abandoned the AC Indigo Star quilt. I bought the kit from Alabama Chanin, the fabric and notions, shapes not precut. It came with a printout of the blog entry and I was told that the shapes just needed to be enlarged. Except they didn’t fit with each other and I didn’t know how much to enlarge them by. Maybe it was my experience as a quilter, but I just couldn’t handle the vagueness of the instructions. This was what sent me off in search of a better solution: Inklingo!

I was told that the finished block size was 7.5″ but at the time, Linda only had the Le Moyne star in 4.5″ or 6″ blocks. I decided that 6″ was close enough and set off printing and cutting diamonds. Just so you know, printing on cotton jersey works just as well as printing on quilter’s cotton!

I already have many stars sewn together but I haven’t really printed many of the squares yet. I’m hoping to get those printed soon because it’s really satisfying seeing the completed block.

Here is the kit I’m currently taking on my commute. Two stars completed in this bag, a third star almost finished, and a stack of diamonds to go.
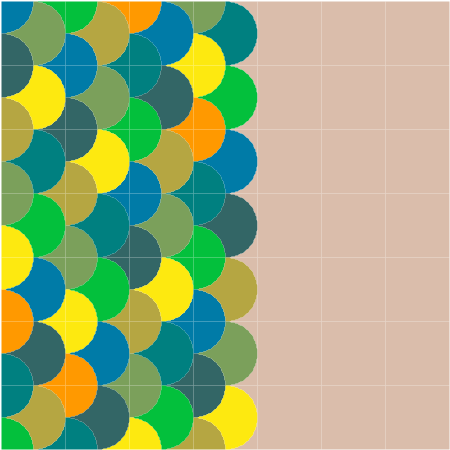
 And in Big, Exciting news, the Winding Ways baby quilt top is finally complete! Doesn’t it look glorious in all its precise-matchedness? And the circles are so perfectly round. Makes me happy.


It’s also basted and in the midst of quilting. I’m currently quilting a quarter-inch inside the circles and I’m thinking of adding an extra ring an inch or two inside of that. Still deciding, though the single ring doesn’t feel like enough quilting. FP_160124__MG_2399.jpgSo that’s the update, finally! Next new projects will likely be of the wood furniture variety. To be continued!

Crochet

A little crochet 

My sister and I went to the Stitches and Craft Show here in Melbourne a month ago. I hadn’t been to this one before, but enjoyed it immensely. Though smaller, it had plenty of vendors and stalls and free parking! I found it to be more intimate overall, and while it was quite crowded in the middle of the day, was pleasant towards the end of the day. So I recommend it!

My sister was planning on participating in a class on crocheting snowflakes but we were too late and the class was full. So instead, we were able to join Prudence Mapstone’s class on double-hook crochetwpid-FP_151126__MG_1806.jpg

It has been a really, really long time since I last crocheted, so my initial stitches are quite loose and inconsistent, but I’ve gotten back into the swing of it. I’m enjoying the change from stitching, but that last seam on the Winding Ways quilt keeps calling to me. I just hate ironing and I really need to do that first!wpid-FP_151126__MG_1807.jpg

Anyway, this is the project that has been accompanying me on my commute to work. I’m thinking of using up all the yarn and somehow doubling it up to make a thick, reversible infinity scarf. Of course, we are heading into summer, so I have plenty of time to get it finished.wpid-FP_151126__MG_1808.jpg 

Inklingo · Quilting

It’s been a while

And, oh, so many things have happened! But mostly, this little guy has been taking all my project time and then some!

Shenandoah, my little superhero
But that’s not all! I’ve been trying to tidy up my project closet, and found some treasures. My very first quilt was the quilt I started in my first quilting class twenty-something years ago. A pinwheel and single Irish chain.

wpid-FP_151031__MG_1690.jpg

Now, this quilt is in daily use and while my fabric choices would be different today, I’m still fond of my first quilt. I was absolutely determined to not have a UFO. It took a couple years, but I made it! So the treasures I found were the tools and items of process in making it.

My design sketches. wpid-FP_151031__MG_1670.jpg The teacher of the class had us make up prototype blocks. I’m not really sure why except maybe to give us a sense of the scale and how our fabrics look together. In retrospect, a good idea, ha!wpid-FP_151031__MG_1669.jpg

And my little plastic templates. The pencil lines give evidence to how often the pencil slipped. Oh, if only Inklingo existed then! And inkjet printers! But it worked and my quilt isn’t too wonky.

wpid-FP_151031__MG_1689.jpg

This was my mini test-quilt where I practiced certain techniques before applying them to the “real” quilt. Techniques practiced: Mitred borders, hand quilting, binding.wpid-FP_151031__MG_1671.jpg
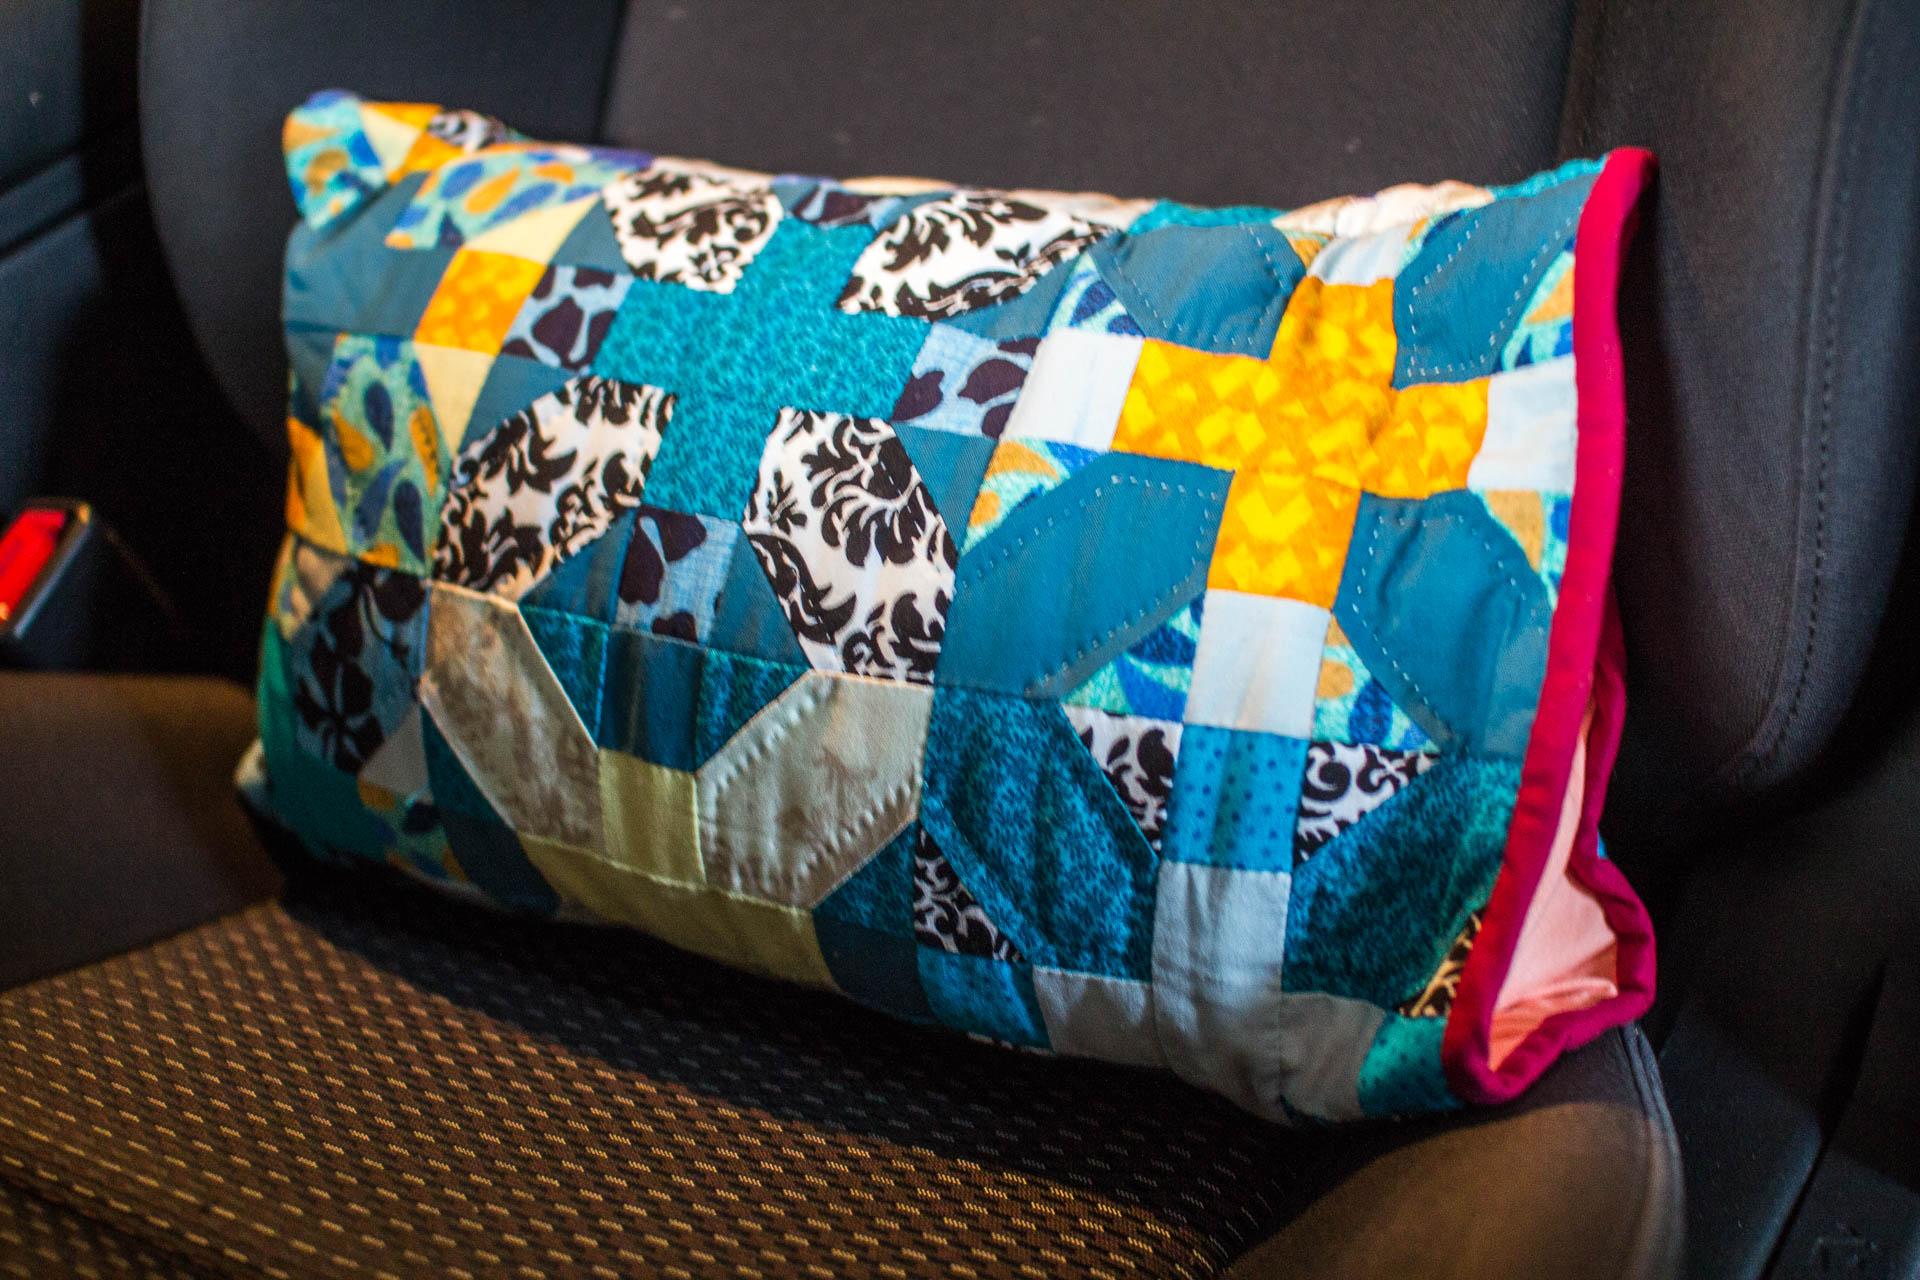
And finally, my Winding Ways quilt.wpid-FP_151029_IMG_7341.jpg

This is four rows sewn together, the last seam is the one that joins four rows to two rows, but I need to press first! I figure it’s easier to press the smaller pieces separately than to try to press the whole top in one go. I might see if I can get to this point today! Maybe even have that last row sewn this week! We can dream!

EQ7 · Quilting

Clamshell Pillow

I signed up for the Curves class by Rachel through her Stitched in Color blog and the Clamshell Pillow is one of the many projects in the class. I haven’t had time to do anywhere near all of them, but I was determined to do at least this pillow! And definitely the Scallop Quilt.

Anyway, I already had a pillow insert but it’s 65 x 65cm, not the size in her pattern, so I used EQ7 to test the pattern on a larger pillow. I used the clamshell template as provided and increased the number to fill almost half the area of the pillow.

(null)
I tried out a few color configurations.

(null)And ultimately decided on the bottom one. Looking at them together, the first doesn’t look a lot different from the last!

wpid-FP_150209__MG_9815.jpgFirst row sewn, second row glued down. So much easier than pins!

wpid-FP_150209__MG_9817.jpgClose-up of the gluing.wpid-FP_150210__MG_9818.jpgAll rows sewn down! Very happy with the result. And the zips arrived in the mail the day before, so no excuses attempting the finish!wpid-FP_150211__MG_9819.jpgThe finished piece!wpid-FP_150211__MG_9820.jpgNot quite invisible, but good enough for first attempt!wpid-FP_150211__MG_9821.jpgAnd another close-up for good measure.

Alabama Chanin

Alabama Chanin Wedding Dress Progress

wpid-FP_141213__MG_9749.jpgSo it seems that I’m getting married very soon. Even though it has been booked for months now, I still feel like it’s snuck up on me. I’ve been frantically working on this and I’m really feeling the panic now as the day looms in front of me.

Dress details: I ordered a custom DIY corset from Alabama Chanin. Tea for both layers, white thread for the reverse applique and construction. Anna’s Garden for the stencil pattern. I had to order extra large, anticipating my increasing girth as my baby grows.

Some detail shots:
wpid-FP_141213__MG_9751.jpg wpid-FP_141213__MG_9750.jpg

Inklingo · Quilting

Winding Ways progress report

new design idea for winding waysI had thought to discard the 7th row and column making the quilt 6×6 blocks instead. When I thought this, I assumed that this would make the quilt much smaller, so proposed to add a 3″ pieced border to compensate, but after throwing up the blocks on the design wall, I decided that the quilt is already a quite decent size. Plus, with all the stuff that’s going on this end of the year, fussing with the border seems like just too much. So I’m just going to bind it in dark purple.

wpid-FP_140903__MG_8277.jpg
Winding Ways on impromptu design wall

Here’s my temporary design wall. I could only fit 5 blocks across, but it gives me a good feel for scale and overall effect of the blocks. The Winding Ways block is quite the stunner!


Inklingo · Quilting

Inklingo Mug Rug Swap 2014

Jillian of Dakota Essence started another Mug Rug Swap way back in January this year, but something must have happened as there haven’t been any updates from her since February. I hope she is okay!
I signed up for this immediately, even though I already had several projects on the boil, because these are fun little projects that have quite a few benefits. They’re fast because they’re small and they offer low-risk opportunities to experiment with new shapes and techniques.
I can’t seem to find my sketch ideas. I remember drawing them, too! But here is my cheat sheet:
20140714-160259-57779370.jpg
Pieces printed and cut, ready to sew:20140624-233647-85007708.jpg
Quilting in progress. Apparently I didn’t take a photo of the top before I trimmed, sandwiched and basted it. You can see my freehanded quilt markings. Also quilted in the ditch.20140624-233648-85008177.jpg
I decided to add some embroidery in keeping with the candy theme. Used the same perle 8 thread that I had bought for the Irish Chain Variation quilt. Yes, I used this mug rug to test out that idea here. This my test of stem stitch before I tried, and opted for, the backstitch. I ended up using chain stitch on the big quilt!20140624-233648-85008688.jpg
The completed mug rug:
20140624-233649-85009135.jpg

wpid-FP_140221_IMG_6183-Edit-Edit.jpgMy Mug Rug swap partner was the lovely Janet and she sent me this gem:

wpid-FP_140312__MG_6074.jpg
Appliqué tea and cake

I love the button cherry! And the other side:

Le Moyne Star
Le Moyne Star

And it came wrapped inside this:wpid-FP_140312__MG_6076.jpgOne day, I think I’m going to make one of the projects in here!

Quilting

I’m done I’m done I’m done!

20140624-231723-83843386.jpg
Hurrah! Another large bed quilt is completed! It’s bound and labeled and drying on the line! Because it is a gift, I’m considering sewing up a bag for it from the leftover scraps. Just need to figure out how big to make it. But really, I’m just thrilled I even labeled it! See!?

20140624-232325-84205878.jpg
UPDATE: The quilt is dry but now I have to wait for it to stop raining long enough for me to take a proper photo of it!